Automatically schedule and send out several different surveys
Table of Contents
In this tutorial you will learn how to schedule and send several different surveys using Automation Engine.
Parameters
Event: * Email Address Added to Participant.
Action: Create and Send Survey Package.
In our study we have two surveys. We want to send our SF-36 survey (General Health Survey) as soon as an email added to the participant and the Medication survey two weeks later after an email address is added to the participant:
Creation steps
- To be able to send out surveys, you will need to create a Survey package first. Learn how to do it here: How to create a new survey package. Keep in mind you will need to create one separate survey package for each survey you want to send when using Automation Engine.
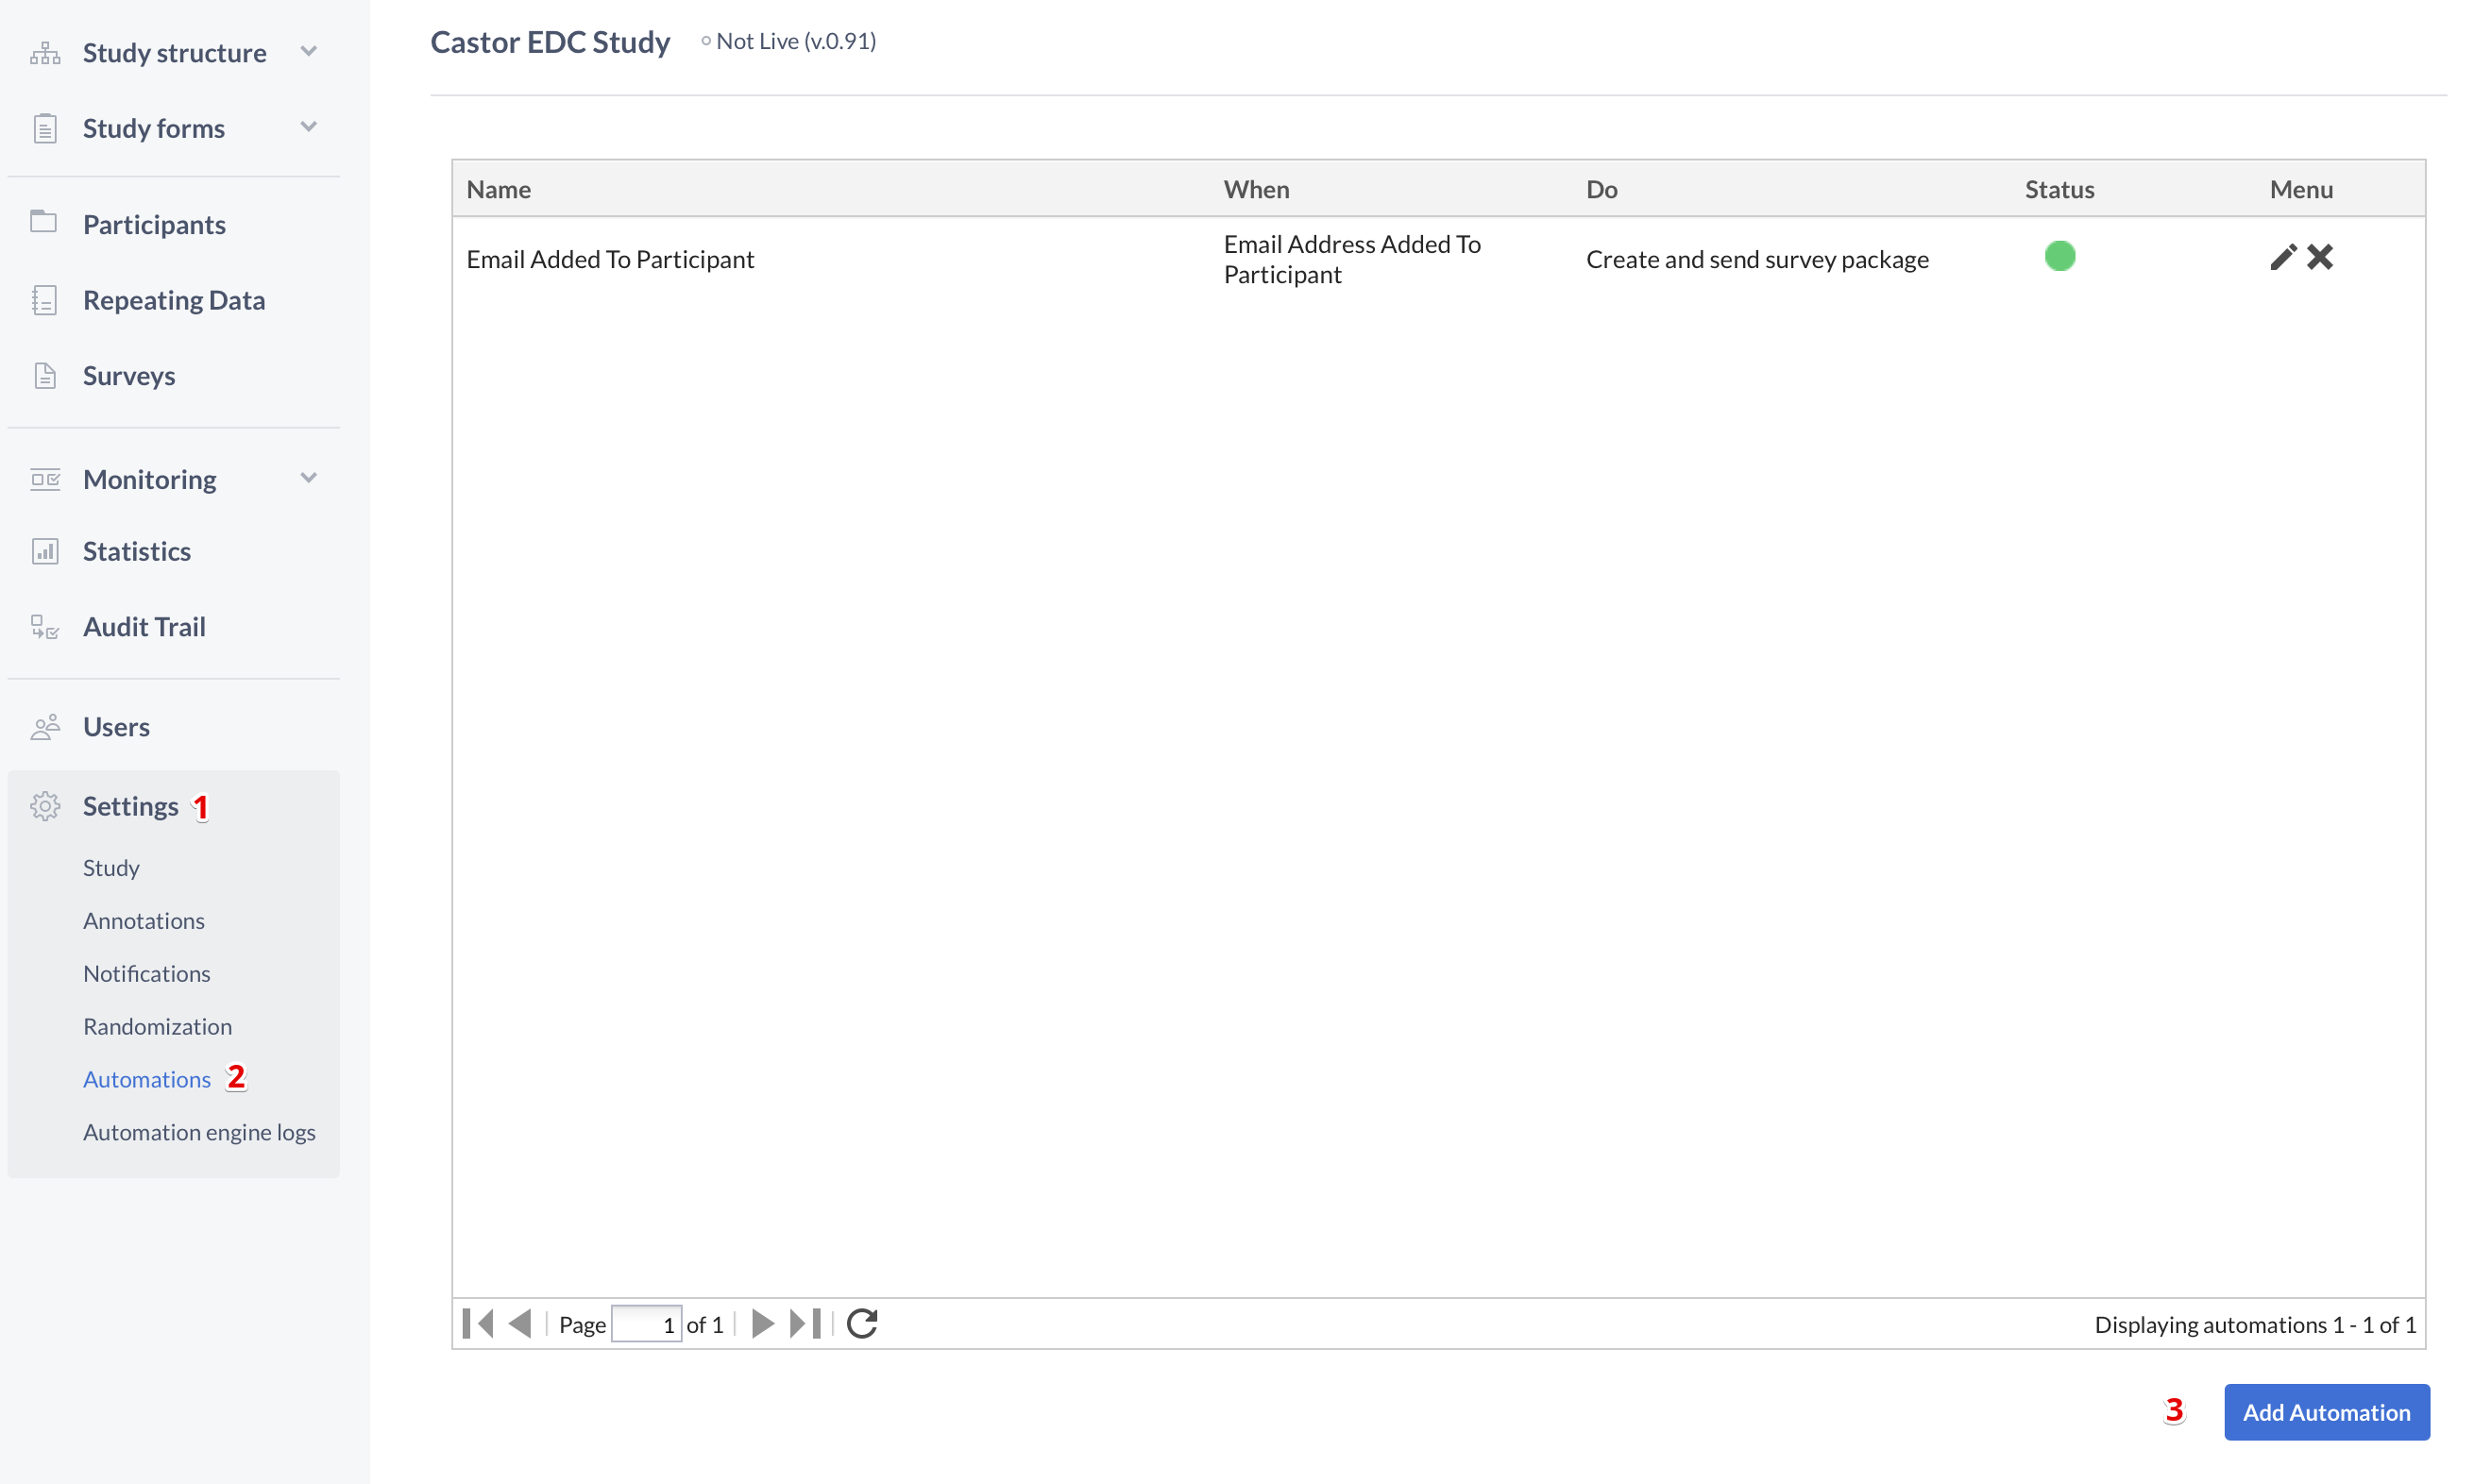
- Turn Automation Engine on within your Study under Study Settings by enabling beta features. If this is not turned on, you will get a warning later on in the Automation Engine. Once they are enabled, you will see tab "Automations" (2) appear in the Study Settings (1). Go to the Automations tab and click on 'Add Automation' (3). A new window will open where you can create your automation.

- To set up an automation, press "Add event" button and choose "Email Address Added to Participant" as a trigger event.
- Then press the button "Action" to select action that will happen once an email address is added to the participant. In our case it is “Create and send survey package”.
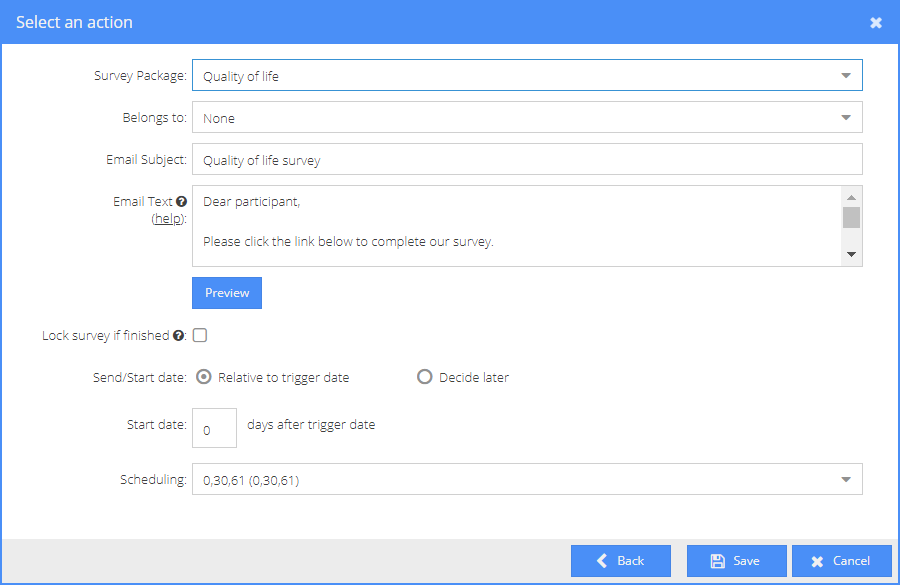
- Set up your survey package

- Survey package: Select the survey package that you are planning to send.
- Belongs to: Assign a visit to which the survey package belongs to.
- Email subject: Once you have selected the survey package, this field will be pre-filled in. Adjust it if necessary.
- Email text: This field will also be pre-filled in with the text added when creating a new survey package in the beginning of this tutorial, make adjustments if necessary,
- Preview: Using the button "Preview" you can test how your text will look like.
- Locked survey if finished: You can select if you want the survey to be automatically locked after participant finished it to prevent making any changes.
- Send/Start date: "Relative to trigger data" means that the survey will be sent after a number of days once the trigger event happens. For example, if the email is added today and we indicate that the survey should be sent 14 days later, the survey will be sent in two weeks starting from today. "Decide later" means that the survey will be planned, but not sent out yet and it would be necessary to manually send it out.
- Start date: Determine the number of days when the survey package should be sent after the trigger event. If the "Start date" is set to 0, the survey package will be sent immediately when the trigger event happens, in our case when an email address is added.
- Scheduling: Add a pre-defined scheduling that will be triggered once the email address is added to the participant. If this feature used with the combination of (8) Start date, this will schedule a survey n days later after the trigger date plus the number of days defined in the schedule. For example, if our schedule is 14 days and the start date is 14 days after trigger date, then our survey will be sent 28 days later.
Once the survey package is set up, add a name to your automation and save it.
Repeat the steps 3-7 for a second automation to schedule another survey. This time we want SF-36 survey (General health survey) to be sent 14 days after an email address is added to the participants. There are two options to set it up.
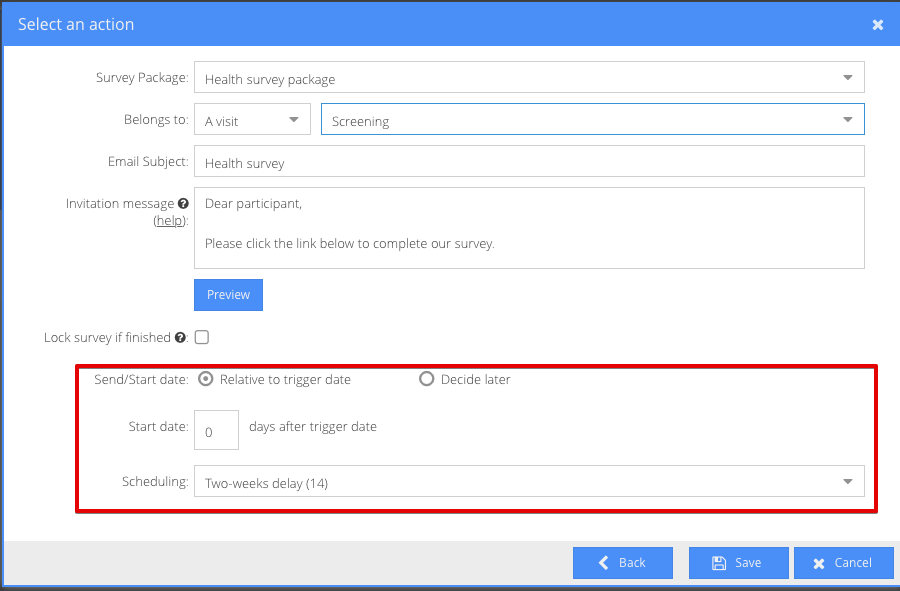
Configure a schedule when creating a survey package. We will set up a schedule with a 14 days delay. When creating a survey package in the Automation Engine, we select
Send/start date: "Relative to trigger date"
Start date: "0 days after trigger date"
Scheduling: Your schedule, for example “Two-weeks delay (14)”

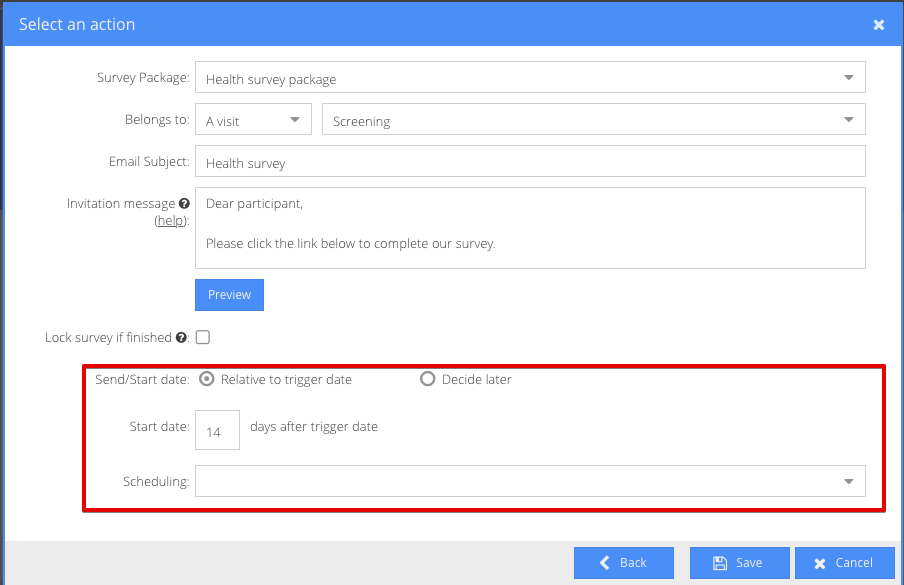
2. When creating a survey package in the Automation Engine, we select:
- Send/start date: "Relative to trigger date"
- Start date: "14 days after trigger date"
- Leave out "Scheduling" empty, as shown below:

Once all is set, click on "Save" to save your survey package settings. Then name your automation and save it. You will now be able to see all the created automations in the Automations tab.
9. After all the automations are created, email addresses need to be added to the participants. It is possible to add email addresses individually to each participant. You can also add email addresses in bulk by importing them.
Note: The automations will be triggered only when an email address is added for the first time. If you will update an existing email address, automations will not be triggered.
10. Finally, after the email addresses are added, you can check if the surveys are planned. To do it, open a participant and go to the Surveys tab. The Surveys tab shows an overview of the sent and planned surveys. You can also click on the tab 'Surveys' to get the overview of all the surveys for all participants.