Troubleshooting Video/Audio
When streaming video and audio, such factors as software, internet speed, bandwidth stability, network security can affect the video/audio quality. In this article we will explain how to troubleshoot potential audio/video issues.
Enabling video and microphone access in the browser
- Google Chrome is highly recommended to share your camera and screen. However, it is also possible to use Firefox, Opera, Safari, or Microsoft Edge. Make sure you are using the lates browser version. See the section below to check your browser version and update it if needed.
- Check your microphone and webcam on your browser settings.
- Check if your camera/microphone permissions are allowed. You can verify that by simply clicking on the lock icon to the left of the address bar.
- Depending on the browser you are using, follow the instructions below to check your microphone and camera access:
Google Chrome
-
Using camera and microphone
- Open a website that wants to use your microphone and camera.
- When prompted, choose Allow or Block.
- Allowed sites: Sites can start to record when you're on the site. If you're using a different Chrome tab or a different app, a site can't start recording.
- Blocked sites: Some sites won't work if you block them. For example, you won't be able to join a video call from the browser.
-
Changing camera and microphone permissions
- Open Chrome Settings by copying "chrome://settings/" on your Chrome address bar.
- Under "Privacy and security," click Site settings.
- Click Camera or Microphone.
- Choose the option you want as your default setting.
- Review your blocked and allowed sites.
- To remove an existing exception or permission: To the right of the site, click Delete.
- To allow a site that you already blocked: Under "Not allowed," select the site's name and change the camera or microphone permission to "Allow."
Firefox
-
Using camera and microphone
- Open Firefox and go to the desired site.
- A confirmation pop-up displays asking if you want to share your device’s camera and microphone with that site.
- Select the Remember this decision checkbox if you want Firefox to remember your selections for this site so that they can be used by default in the future.
- Click the Allow button if you want to share these devices with the site.
- Click the Block button if you don’t want to share these devices with the site.
-
Changing camera permissions
- In the Menu bar at the top of the screen, click Firefox and select Preferences.
- Click Privacy & Security from the left menu.
- Scroll down to the Permissions section.
- Click the Settings… button for the Camera option.
- Firefox displays the websites with saved Allow or Block permission. Use the Allow/Block selector to change permission for the website. You can remove the site by selecting it from the list and clicking the Remove Website.
- Select the Block new requests asking to access your camera checkbox if you do not want to give any other sites access to your camera.
- Click the Save Changes button.
-
Changing microphone permissions
- In the Menu bar at the top of the screen, click Firefox and select Preferences.
- Click Privacy & Security from the left menu.
- Scroll down to the Permissions section.
- Click the Settings… button for the Microphone option. Firefox displays the websites with saved Allow or Block permission.
- Use the Allow/Block selector to change permission for the website. You can remove the site by selecting it from the list and clicking the Remove Website.
- Select the Block new requests asking to access your microphone checkbox if you do not want to give any other sites access to your microphone.
- Click the Save Changes button.
It is also possible to use the permissions setting in the Firefox's address bar to clear camera or microphone permissions for a site. For this, click the permissions  icon that displays in the address bar on the left. Any relevant permission statuses for the current site are displayed in the Permissions panel. Click the X next to Allowed , Allowed Temporarily, Blocked or Blocked Temporarily to clear the status so that Firefox will ask again for permission when you next visit the site.
Safari
-
Using camera and microphone
- Open Safari and go to the desired site.
- A confirmation pop-up displays asking if you want to share your device’s camera and microphone with that site.
- Click Allow to allow access to your camera and microphone. Clicking Never for this Website or Don't allow will block the site from accessing your camera/microphone. You can adjust this preference in the Settings. See instructions below.
-
Changing camera and microphone permissions
- In the Safari app on your Mac, use Websites preferences to customise how you browse individual websites. To change these preferences, choose Safari > Preferences, then click Websites.
- The settings you can customise (such as Camera and Microphone) are listed on the left.
- To apply a setting to a website on the right, first select the setting, then choose the option you want from the pop-menu next to the website.
- For Camera/Microphone, the following options are available:
- Ask: The site must ask if it can use the camera/microphone on your Mac.
- Deny: The site can’t use your camera/microphone.
- Allow: The site can always use your camera/microphone.
Checking the browser version and updating the browser
Google Chrome
-
Checking browser version and updating the browser
- Copy "chrome://settings/help" into your Chrome address bar.
- The browser version will be displayed along with the message whether the browser is updated or an update needs to be installed.
To apply any available updates, click Relaunch.
Firefox
-
Checking browser version and updating the browser
- On the menu bar, click the Firefox menu and select About Firefox. The About Firefox window will appear. The version number is listed underneath the Firefox name. Opening the About Firefox window will, by default, start an update check. If an updated version of Firefox is available, it will be automatically downloaded.
Safari
-
Checking browser version
- Open Safari browser on your Macbook.
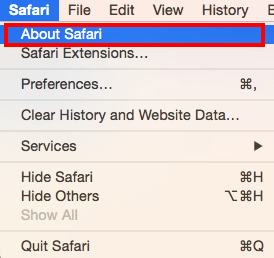
- Select the About Safari option under the Safari menu.

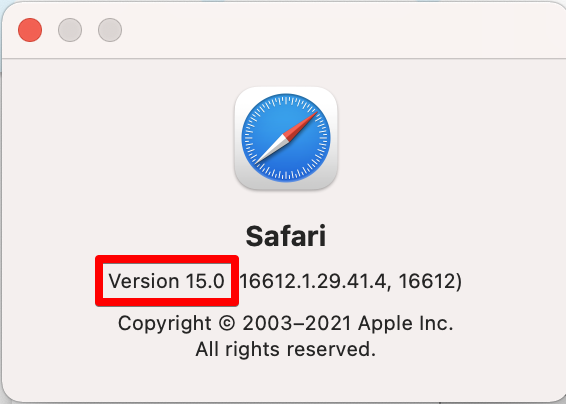
- A new window will open with the safari version number. The first number located before the number written under the bracket is your current version of Safari browser.

-
Updating browser
- Click the Apple logo in the top-left corner of the screen and selecting "System Preferences."
- Select "System Updates" — it's marked with a gear icon. Your computer will then check if there are any updates or upgrades available.
- If there are upgrades available, click "Upgrade Now" to continue. This will install all updates including the ones for Safari, if there are any available.